 By
By Chapter 7:
Delete articles
We now have an app to add, read and edit articles. Our final step is the Delete process, and it will look like this:
- The user clicks the ‘Delete’ button.
- A popup appears, asking the user to confirm if they wish to delete the selected article.
- If the user clicks ‘Yes’, we delete the article. Otherwise, we do nothing.
- If the article is deleted, we refresh the Homepage to remove the deleted article.
We’ll walk through these steps below.
Step 1: The Delete button
First, let’s create our ‘Delete’ button:
Go to Design View of your ‘ArticleView’ Form, and drop a FlowPanel  onto the page next to the
 edit_article_button. Move that button into the FlowPanel then drop a second button into the FlowPanel. Set the align property of the FlowPanel to ‘right’. Resize components as needed.

Select the new button, and rename it delete_article_button. Change the role to filled-button and the background property to ‘Error’. Use the trash icon in place of text to indicate that the button will delete the article.
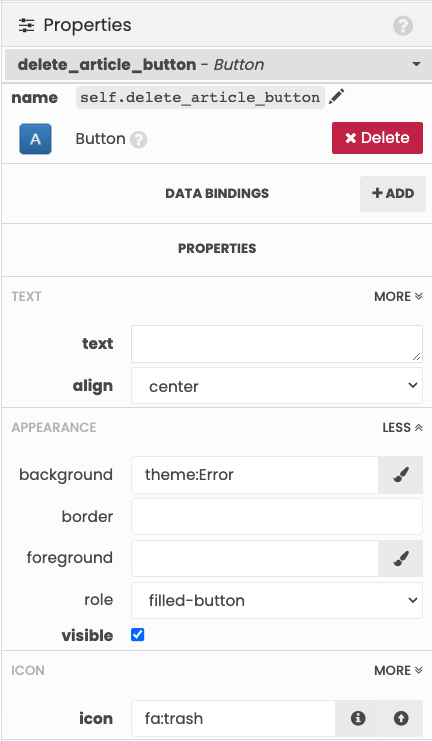
The properties for the Delete button
Finally, adjust the column width if necessary to make sure both buttons are displayed properly (use Ctrl+drag / ⌘+drag for finer adjustments).
Now, let’s create an event handler for your delete button by double clicking the button in the designer.
  @handle("delete_article_button", "click")
  def delete_article_button_click(self, **event_args):
    """This method is called when the button is clicked"""
passStep 2: Confirm the user wants to delete the article
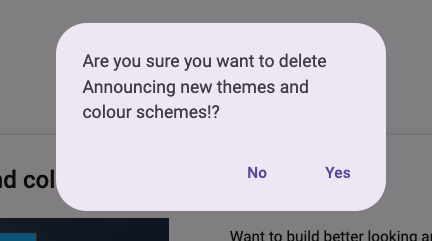
When the delete button is clicked, we want to display a popup asking the user to confirm if they want to delete the article. We do this with a confirmation, which is just an alert with pre-built “Yes” and “No” buttons.
Update your delete_article_button_click function to look like this:
  @handle("delete_article_button", "click")
  def delete_article_button_click(self, **event_args):
    # Check that the user does want to delete the selected article
    confirm(f"Are you sure you want to delete {self.item['title']}?")
This will display a confirmation popup with the article’s title, asking the user if they want to delete the article. Run your app, click on the delete button to make sure the confirmation works.
Step 3: Delete the article or do nothing
We’ll write the function for deleting articles from the Data Table inside a Server Module.
Add this function to your Server Module to delete the row from the Articles Data Table:
@anvil.server.callable
def delete_article(article):
  # check that the article being deleted exists in the Data Table
  if app_tables.articles.has_row(article):
    article.delete()
  else:
    raise Exception("Article does not exist")
As with the Update function, we’ve added a security check to ensure that the article actually exists in the Data Table. If not, the server function will raise an exception. Without this check, a malicious user could delete any row from any table by passing it to this function.
We’ll call this server function from our Homepage rather than the ‘ArticleView’ Form. It’s a good idea to keep the CRUD operations on the main Form (our Homepage in this case) where possible.
The delete button is on the ‘ArticleView’ Form, but when it’s clicked, we want to call a function on our Homepage Form. We do this by raising an event on the ArticleView’s parent container.
You can look up any component’s parent container with the .parent attribute. In this case, all our ‘ArticleView’ instances are inside the articles_panel on our HomePage. So we can access articles_panel from within any ‘ArticleView’ on this page, and raise an event on it.
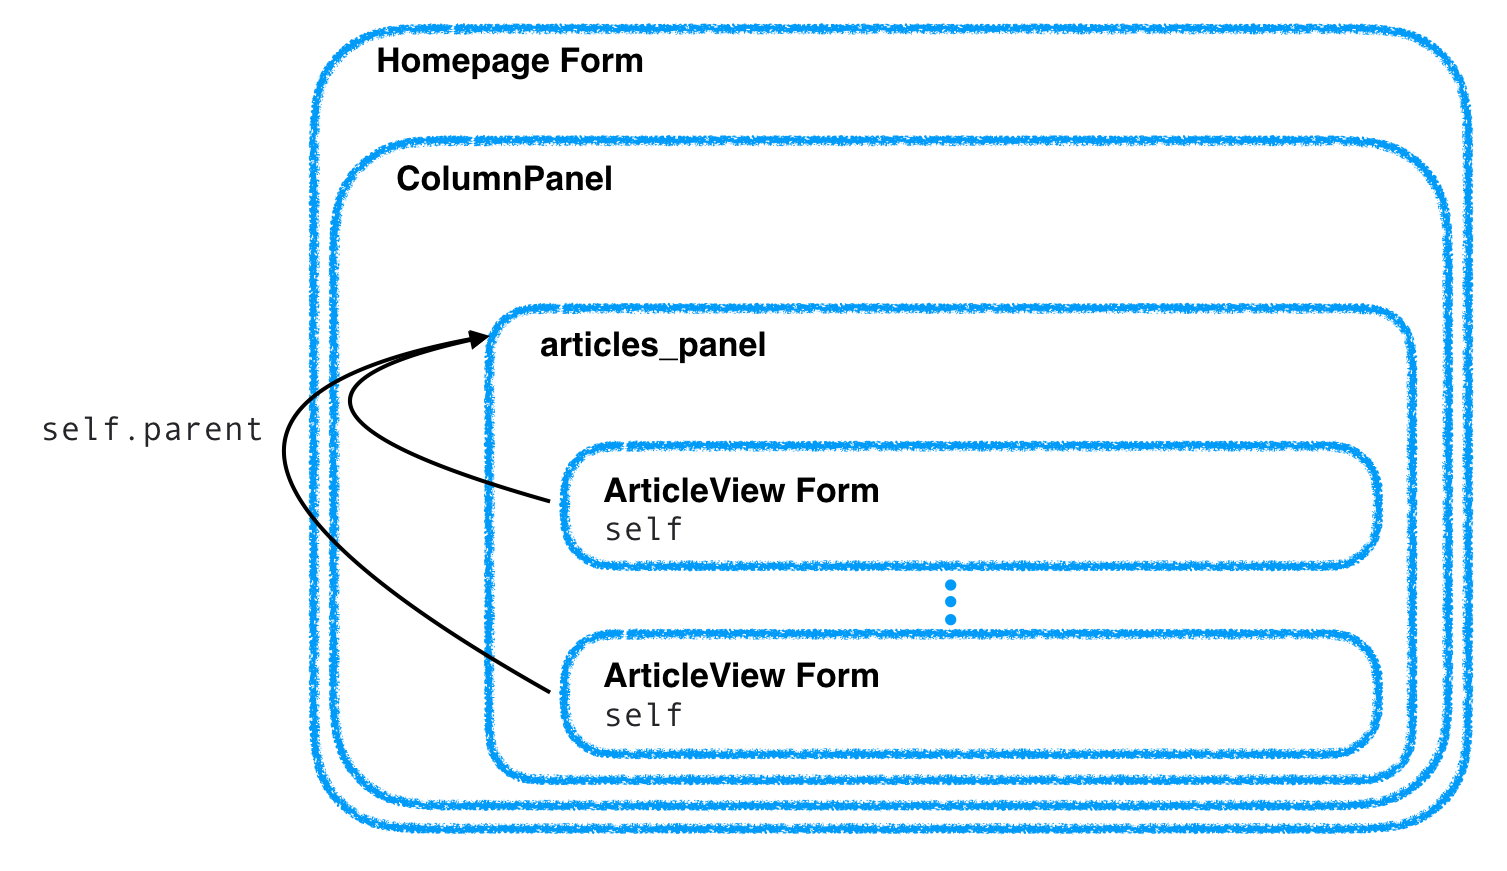
self.parent when called on the ArticleView Form refers to the articles_panel on the Homepage.
We should now set up a custom event handler on the articles_panel on our Homepage. Then, we can raise this custom event when the delete button on our ‘ArticleView’ Form is clicked and catch it on our Homepage.
We need a method that calls the delete_article server function whenever the x-delete-article event is raised. Go back to your ‘Homepage’ Form and create a method called delete_article. It should be decorated with @handle and have **event_args as an argument:
  @handle('articles_panel', 'x-delete-article')
  def delete_article(self, article, **event_args):
    # Delete the article
    anvil.server.call('delete_article', article)
We’ll call this function when the delete button on our ‘ArticleView’ Form is clicked, so go back to your ‘ArticleView’ Form, and edit your delete_article_button_click to look like this:
  @handle("delete_article_button", "click")
  def delete_article_button_click(self, **event_args):
    # Get the user to confirm if they wish to delete the article
    # If yes, raise the 'x-delete-article' event on the parent
    # (which is the articles_panel on Homepage)
    if confirm("Are you sure you want to delete {}?".format(self.item['title'])):
      self.parent.raise_event('x-delete-article', article=self.item)
The delete button on our ‘ArticleView’ Form will now raise the ‘x-delete-event’ on our articles_panel, which we just configured to call the self.delete_article function on the Homepage. This will call our server function and delete the article.
Step 4: Refresh the list of articles if an article is deleted
The final step is to call the self.refresh_articles() function on the Homepage if an article is deleted.
Update the self.delete_article() on your Homepage to look like this:
def delete_article(self, article, **event_args):
  # Delete the article
  anvil.server.call('delete_article', article)
  # Refresh articles to remove the deleted article from the Homepage
  self.refresh_articles()
Run your app and try deleting an article.
Step 5: Publish your app
Now that the app is finished, you can easily publish it online for anyone to use. Click the ‘Publish’ button at the top right of the editor, then select ‘Publish this app’. You can use the public URL provided or enter your own, or, if you want to share your app privately, you can switch to a private URL.
And that’s it! Your app is now deployed to the cloud and ready to use.
You’ve just built a working database-backed “CRUD” app in Anvil.
You can also use the following link to clone the finished app and explore it yourself:
Bonus material: Challenge yourself
This part is optional! In the next chapter, we’ll take a look at extending the functionality of our app to allow multiple users to create accounts and sign in.
What next?
Head to the Anvil Learning Centre for more tutorials, or head to our examples page to see how to build some complex apps in Anvil.
Multi-user Applications

Build a Simple Feedback Form
Display data on a dashboard
Turning a Google Colab Notebook into a Web App
Generate PDF Invoices with Python