 By
By OIDC under the microscope
In a previous blog post we covered SSO, what it is, and the two main technologies that are used to implement it. In the next post, we covered SAML, the first of these technologies. This time, we’re taking a deep technical dive into the other: OpenID Connect - often abbreviated to OIDC - and OAuth, the authorization protocols that support it.
This blog post covers the following:
- What OAuth is, and what problems it was built to solve
- Why it can’t be used for authentication
- What OpenID Connect is, and how it uses OAuth
- Importantly, is it secure?
Let’s jump in!
What is OAuth?
This section gives a fairly high-level primer on OAuth, intended to illustrate what it is in the context of OIDC. In and of itself, OAuth is a deep topic with lots of interesting security aspects; for the sake of brevity, we won’t be covering all of them.
Wikipedia defines OAuth (short for Open Authorization) as ‘an open standard for access delegation’. In this context, ‘access delegation’ means allowing one entity access to something (for example, information) controlled by another entity. The act of allowing this access is delegation, hence ‘access delegation’.
… so what does it do?
Let’s take a real-world example: I have a Gmail account, and I want to use a service that’ll go through all the automated emails I received in the last 90 days and send responses asking each of the senders to delete the data they have on file about me. That means that the service will need to be able to read my emails, and send emails from my account. However, I don’t want to just give the service the credentials I use to log in to my Google account; that would also give it access to my Drive, any location data history the Google Maps has collected, and so on.
Instead, the service should only be able to perform the actions I want it to, and that’s where OAuth comes in. OAuth provides a mechanism for allowing that service to request access specifically to only the actions it needs, without compromising the security of other information or restricted actions managed by my Google account.
In OAuth world, there are a few different entities:
- The user is called the Resource Owner: in the above example, this is me! I own the resources (the ability to read and send email) that I want to be able to share with the client service.
- The client service is called the Relying Party: in the above example, this is the service that’ll automatically read and send emails for me, and it relies on an OAuth flow in order to get access to those actions.
- The Identity Provider is also called the Authorisation Server: This is where I can go to prove ownership of my Google account, and authorise the client to use my resources.
- The Resource Server is where those resources to which I have delegated access live. In the above example, this is a Gmail server. In a lot of examples, this will be managed by the same organisation as the Authorisation Sever, but that isn’t strictly necessary.
How does it work?
The big concept that drives OAuth is the idea of tokens. Tokens are objects that the Authorisation Server can issue for a client to use, and in OAuth there are two different kinds:
- Access Tokens are used by the client to access a given resources from the Resource Server. The Resources Server needs to be able to parse the information from within the token, and give exactly the access requested (and no more!). Access Tokens are also sometimes called bearer tokens, because any entity which gets hold of them (‘bears’ them) will then have access to those resources. For this reason, they should have an expiration date built-in, after which point the Resource Server will deny access.
- Refresh Tokens are used by the client to get a new Access Token if the one they currently have has expired. These tokens are longer-lived, and are typically stored by the client application in a secure server.
There are a few different important qualities that tokens need to have:
- They should be opaque to the client application. The email service in the above example doesn’t need to know what’s inside the tokens it receives; all it needs to do is send them on to the relevant servers.
- When the Relying Party makes a request for a token, that request will include a scope (or multiple scopes) for the token that determines exactly what resources it grants access to. OAuth is a standard and not a framework, so it doesn’t set out any scopes explicitly, instead leaving them up to the internal implementation of the Authorisation and Resource Servers. In the email service scenario, the scopes involved would require allowing access to reading and sending emails, but not (for example) access to my Google Drive.
An OAuth Authorisation Server will have a few different endpoints which are used at various stages in the process. In the following flow, we’ll see a couple:
/authorize, which lets the user grant access - for example,https://my-oauth-server.com/authorize/token, which is where the Relying Party sends its requests for tokens - for example,https://my-oauth-server.com/token
The Resource Server will also have a variety of endpoints, depending on what kind of resources it serves; it’s up to the Relying Party to make sure they access the correct one.
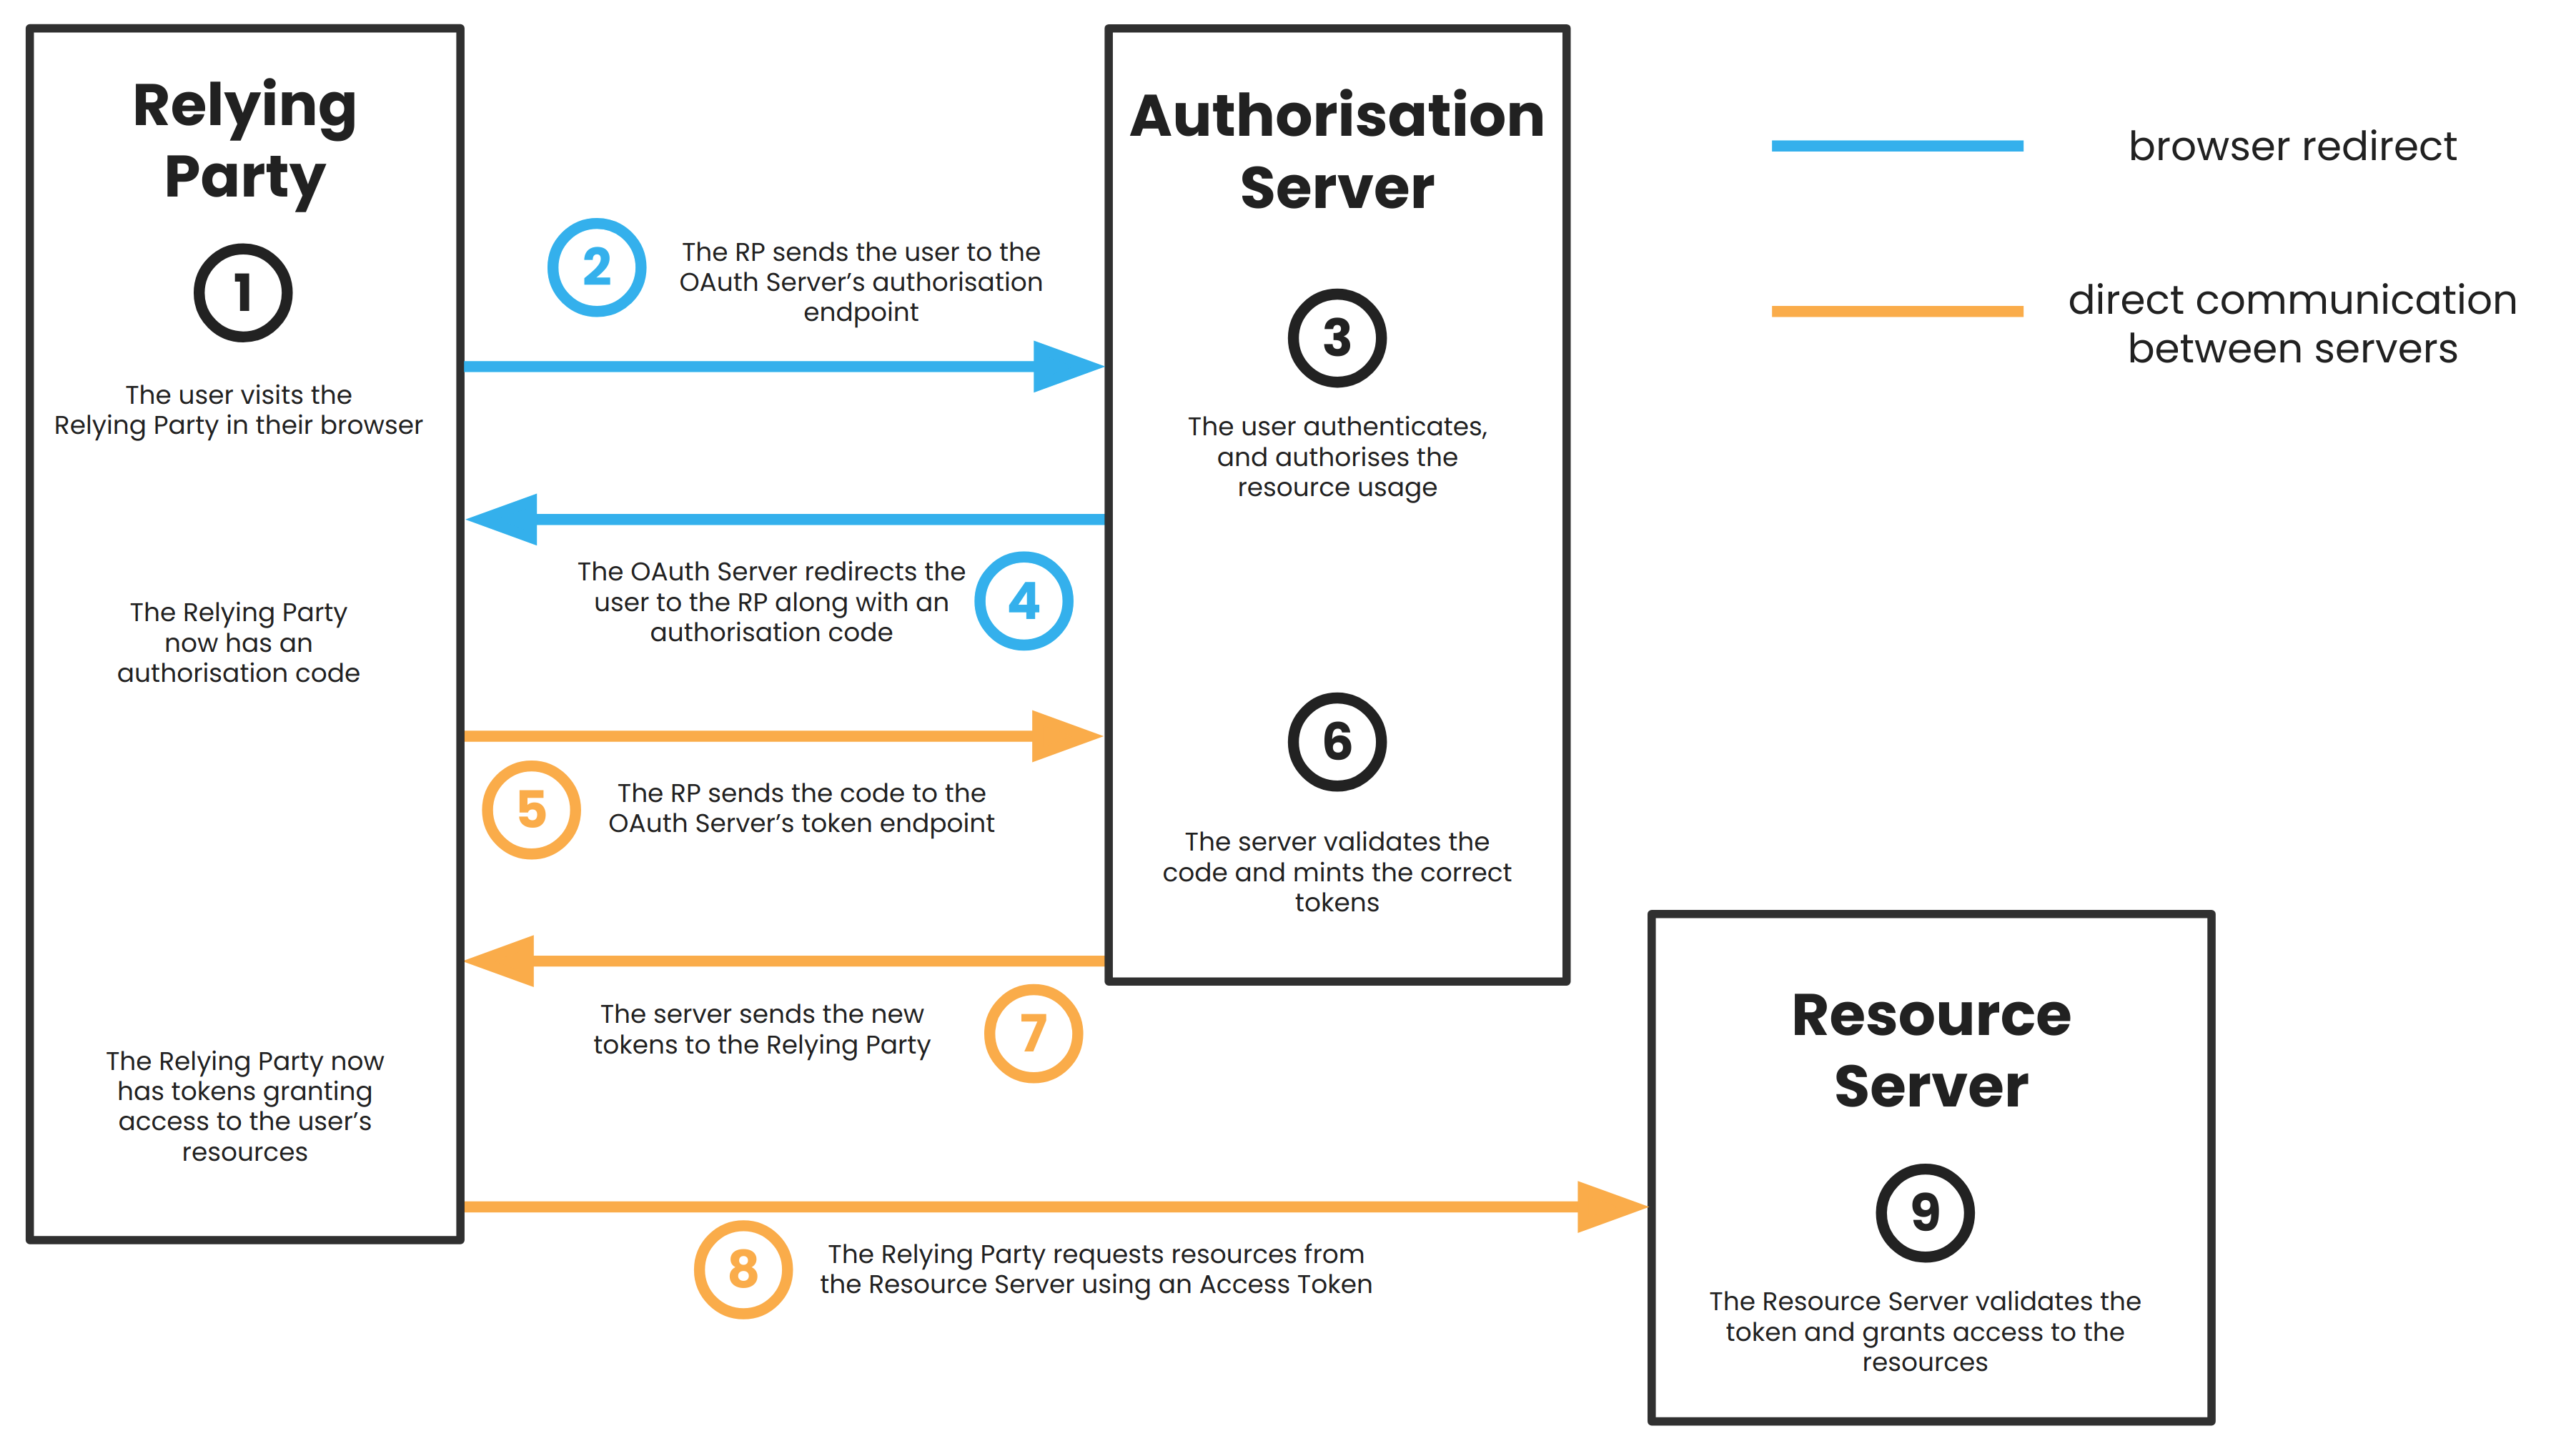
So, authorising a client to use some of your resources that are hosted on a Resource Server goes like this:
- You, the Resource Owner, visit the Relying Party that wants access to your resources.
- In the above example, this would be visiting the website of the service that’ll automatically ask people to delete my data.
- The Relying Party sends you to the Authorisation Server’s
/authorizeendpoint with a request for an authorisation code.
- This is where you’ll be redirected in your browser to a Google screen, asking you if you want to allow the email service appropriate access.
- You authenticate with the Authorisation Server and grant resource access. Your role as the Resource Owner is now done.
- The Authorisation Server sends you back to the Relying Party along with an authorisation code.
- In the above example, this is you being redirected back to the website for the email service.
- The Relying Party then uses that code to request an Access Token with appropriate scopes from the Authorisation Server’s
/tokenendpoint. - The Authorisation Server then mints a new Access Token and (optionally) a Refresh Token.
- The Authorisation Server sends those tokens back to the Relying Party.
- The Relying Party sends the Access Token to a relevant endpoint at the Resource Server in order to ask for access.
- This endpoint is where the email service asks to download the last 90 days’ worth of emails to my inbox.
- The Resource Server validates the token and grants access.
- This is the point at which access to my emails has now been successfully delegated to the automatic email service.
Then, going forwards, as long as the client application has a valid Access Token (either from this process or by requesting a new one using its Refresh Token), it doesn’t need you as the Resource Owner to grant access again. If the Refresh Token expires or is revoked, then this flow will need to happen again.
And that’s how OAuth allows you to delegate access to your resources!
Why do we need something else for authentication?
Reading the above, you might think that OAuth is sufficient for authentication purposes. After all, if you want to use an OAuth-provided identity to log in with a third party service, OAuth already exists to facilitate permissions sharing between those two services, right? Well, that’s just the thing: an OAuth token creates a relationship between those two services, letting one use the other’s resources. You, as the user, are really only there at token creation time in order to agree that that relationship is OK; after that, OAuth doesn’t care whether or not you’re authenticated.
OAuth isn’t about identity, it’s about resources, and the authorisation to use those resources. These concepts are closely connected, but they’re not the same, and getting them mixed up can lead to gaps in security. It’s absolutely possible to do authentication with OAuth, and it’s people did before OIDC - but you have to be very careful when implementing it.
For example, it might be tempting to assume that a valid Access Token constitutes proof of identity. After all, the user had to authenticate with the OAuth identity provider in order for that Access Token to exist. Unfortunately, there are multiple issues with this approach. One problem is that user authentication isn’t the only time that Access Tokens can be created; any client with a Refresh Token can create one. This is in fact a fundamental design requirement of OAuth, since it exists to ease the sharing of resources between services, and shouldn’t require user presence at all stages!
Another issue is that, since Access Tokens are opaque to the client by design, the third-party service that receives the Access Token as proof of identity won’t be able to get any information from it. In fact, the service won’t even be able to inspect the token to verify that the user is who they say they are! This is because the client isn’t actually who the Access Token is for - it’s meant to be parsed by the OAuth Resource Server, not the third-party service itself.
OAuth isn’t unusable for authentication - but we can do better
In the past, we worked around all this by having the client follow the above OAuth Flow, after which it would use the resulting Access Token to hit an endpoint on the Authorisation Server. This endpoint, often located at /me, would then allow the Authorisation Server to parse that Access Token and tell the Relying Party on which user’s behalf it was issued. But, this is fairly roundabout, and easy to get wrong; for example, when building a Relying Party you’d need to make sure that you only used Access Tokens received directly from the Authorisation Server in order to mitigate the risk of a malicious actor using an ill-gotten token to falsely authenticate.
What if we had something designed for the purpose? We’d need a token that’s only created at authentication time, and is designed to be parsed by the client.
That’s what OpenID Connect does!
What is OpenID Connect?
The key thing that OIDC provides is the idea of an ID Token - a token designed to be used as proof of OAuth identity, for consumption by the client service. ID Tokens, unlike Access and Refresh tokens, have a specified format: they’re constructed as JSON Web Tokens (or JWTs). JWTs are JSON payloads which are then cryptographically signed by the issuer. This means that they’re protected from tampering, but they can still be parsed by the recipient.
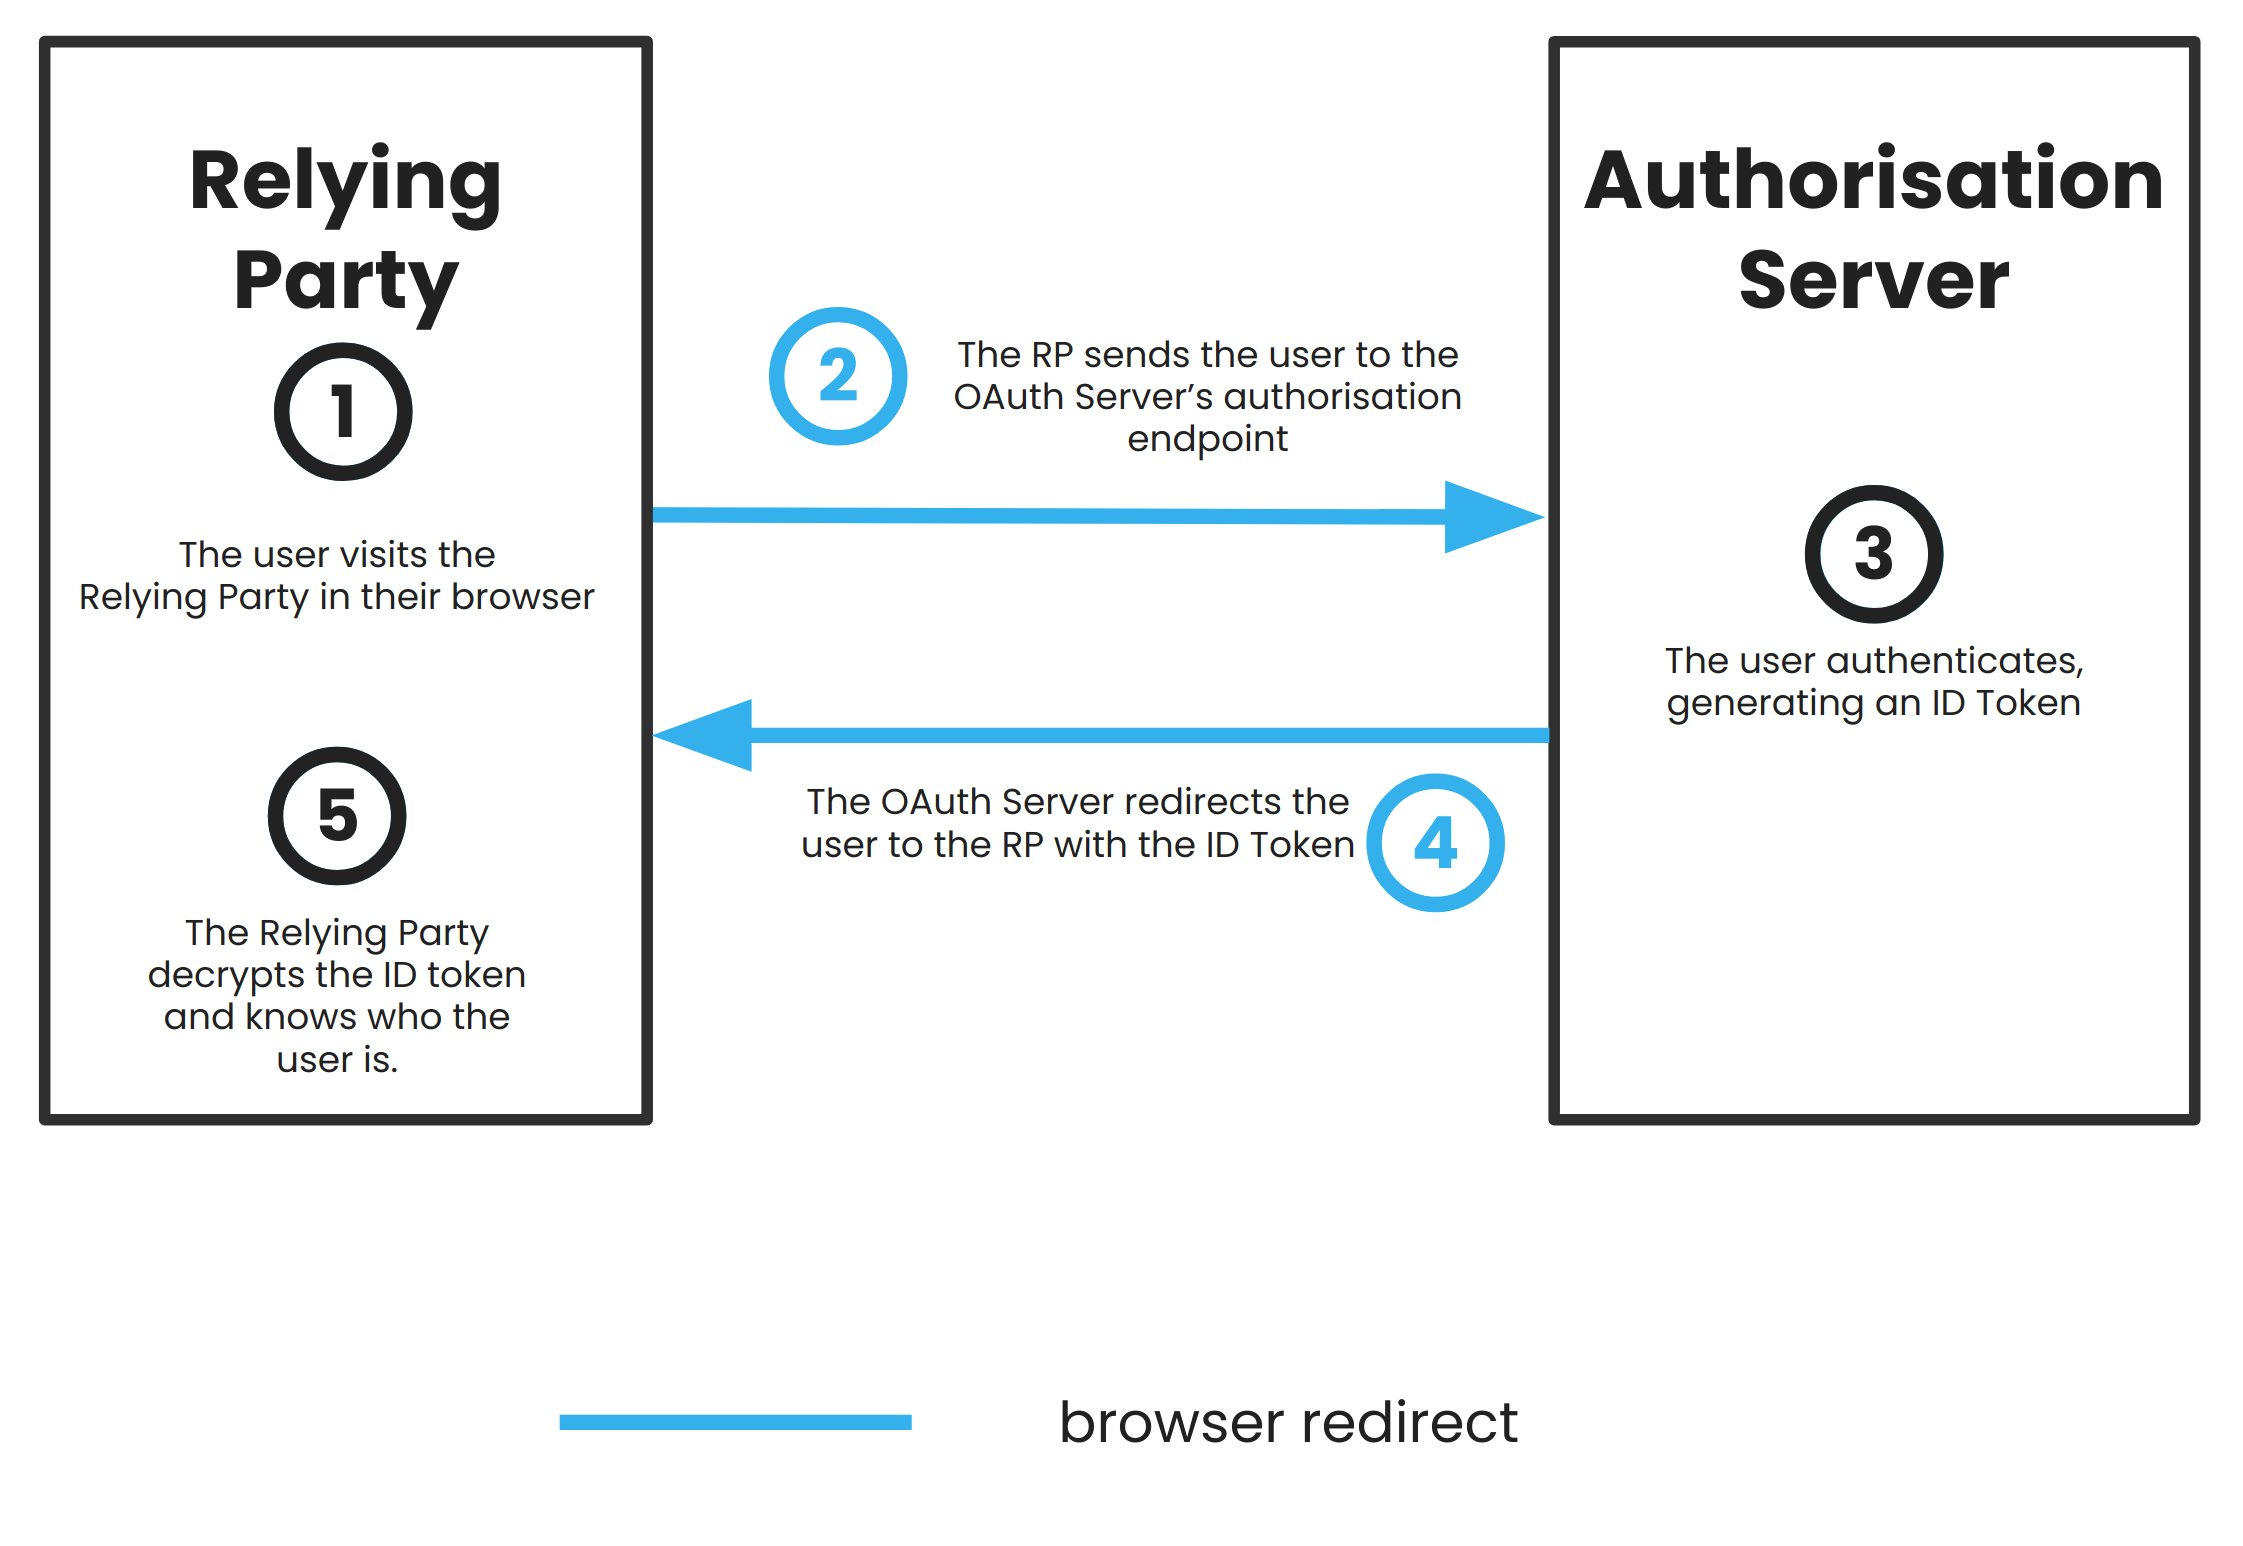
The flow for a user authenticating with a Relying Party using their OAuth Identity then looks like this:
- You, the Resource Owner, visit the Relying Party with which you want to authenticate.
- The Relying Party sends you to the Authorisation Server’s
/authorizeendpoint, along with a request for one or more tokens.
- At this point, the Relying Party can request either an ID Token on its own, or an ID Token and an Access Token.
- You authenticate yourself with the Authorisation Server.
- The Authorisation Server then mints the tokens that the Relying Party requested, and sends them back to the Relying Party.
- The Relying Party can now decrypt the ID Token, and use it to verify your identity and authenticate you.
- If the Relying Party also requested an Access Token, it can then use this later to get more user information about you from the Authorisation Server by using it to hit a
/userinfoendpoint.
Note that the Resource Server isn’t involved at all. The only ‘resource’ you’re trying to share is proof of your identity, and that’s solely the domain of the Authorisation Server.
In reality, the ID Token is quite different to the Access and Refresh Token types. It isn’t meant to be used by the Resource or Authorisation Servers; it’s just a record of the authentication event that occurred when the user logged in to the Authorisation Server. But that’s all that the Relying Party needs in order to know who you are.
If the Relying Party also wants to know extra information about you, then it needs to request an Access Token which has the relevant scopes - for example, email and address - and it can do this at the same time, as mentioned in the flow above. (It might seem like one could just use the /userinfo endpoint to use OAuth itself for authentication, but that endpoint is in fact something that’s defined by the OIDC spec, and isn’t required for OAuth.)
OIDC and security
So, how can this all go wrong? Well, there are a few different ways, including the following:
- The OAuth Authorisation Server wrongly grants tokens to a malicious third party.
- An Access Token created for a legitimate Relying Party makes its way into the possession of a malicious entity, enabling it to masquerade as that Relying Party.
- The Relying Party receives and trusts a token that was actually created by a malicious entity.
In order to address the first problem, a Relying Party needs to have an existing relationship with the OAuth Identity Provider before it can use OIDC to authenticate its users. This involves the Relying Party being registered with that OAuth Server and having a client ID and a client secret. That identifying information is then included whenever the Relying Party makes a request for tokens, so that the OAuth Server can be sure that the request is legitimate. Of course, this means that that ID and secret need to be stored securely by the Relying Party; for instance, all API calls using them should be made from a server, rather than a user’s browser.
The second possibility could come about in a couple of ways; either the Access Token is intercepted in transit, or it’s leaked to external parties by the legitimate Relying Party. To avoid the first of these, all the API calls should be made using HTTPS, so that all the traffic is encrypted and can’t be inspected by any onlookers. To avoid the second problem, it’s important that the Relying Party should always treat Access Tokens securely, and this includes only ever using them in a server and not in the user’s browser (just as with the client ID and secret).
The third problem is largely prevented by the fact that ID Tokens are JWTs, which are cryptographically signed by design. If, however, the OAuth Authorisation Server isn’t signing its JWTs (which it should!), then this vulnerability can be mitigated by the Relying Party only ever trusting tokens that result from a direct API call. It can also verify the tokens it receives by sending them to the Authorisation Server’s /introspect endpoint, which will tell the Relying Party whether or not a given token is valid.
Using OpenID Connect in your web apps
So, what do you need to do in order to enable OpenID Connect authentication for your web apps? Well, you need your web app to be able to make the appropriate API calls to your OAuth Identity Provider of choice (making sure you ask for the right kind of tokens!) and for your app to be able to safely handle the responses it gets. Unfortunately, this can be pretty fraught, because you need to be certain that you’re doing everything correctly at every stage of the process, or else you risk falling foul of some of the vulnerabilities we discussed above. However, once it’s set up, you get all the benefits of SSO.
Anvil apps come with several ready-made options for using OIDC-based SSO; several OpenID Identity Providers such as Google and Facebook are already configured.
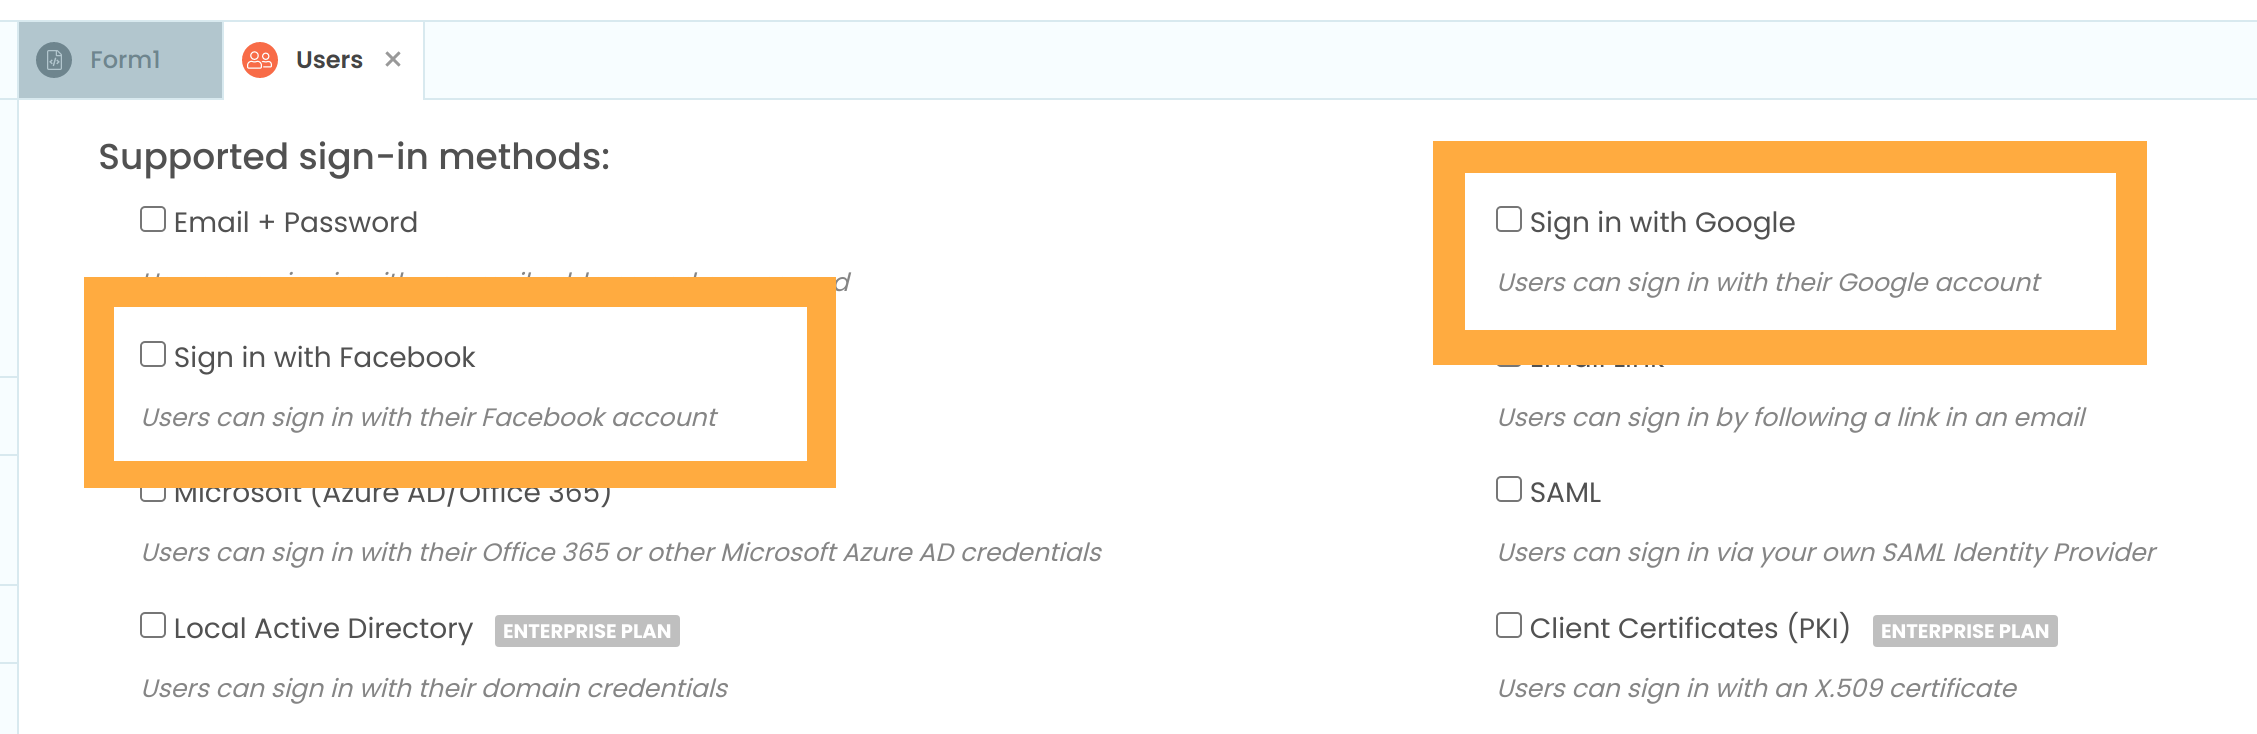
It’s nice to know about tokens… but you don’t have to.
Enabling SSO for your users is as simple as using Anvil’s built-in User Authentication service, and ticking a single checkbox. Easy!
More about Anvil
If you’re new here, welcome! Anvil is a platform for building full-stack web apps with nothing but Python. No need to wrestle with JS, HTML, CSS, Python, SQL and all their frameworks – just build it all in Python.
Learn More
Get Started with Anvil
Nothing but Python required!
Seven ways to plot data in Python
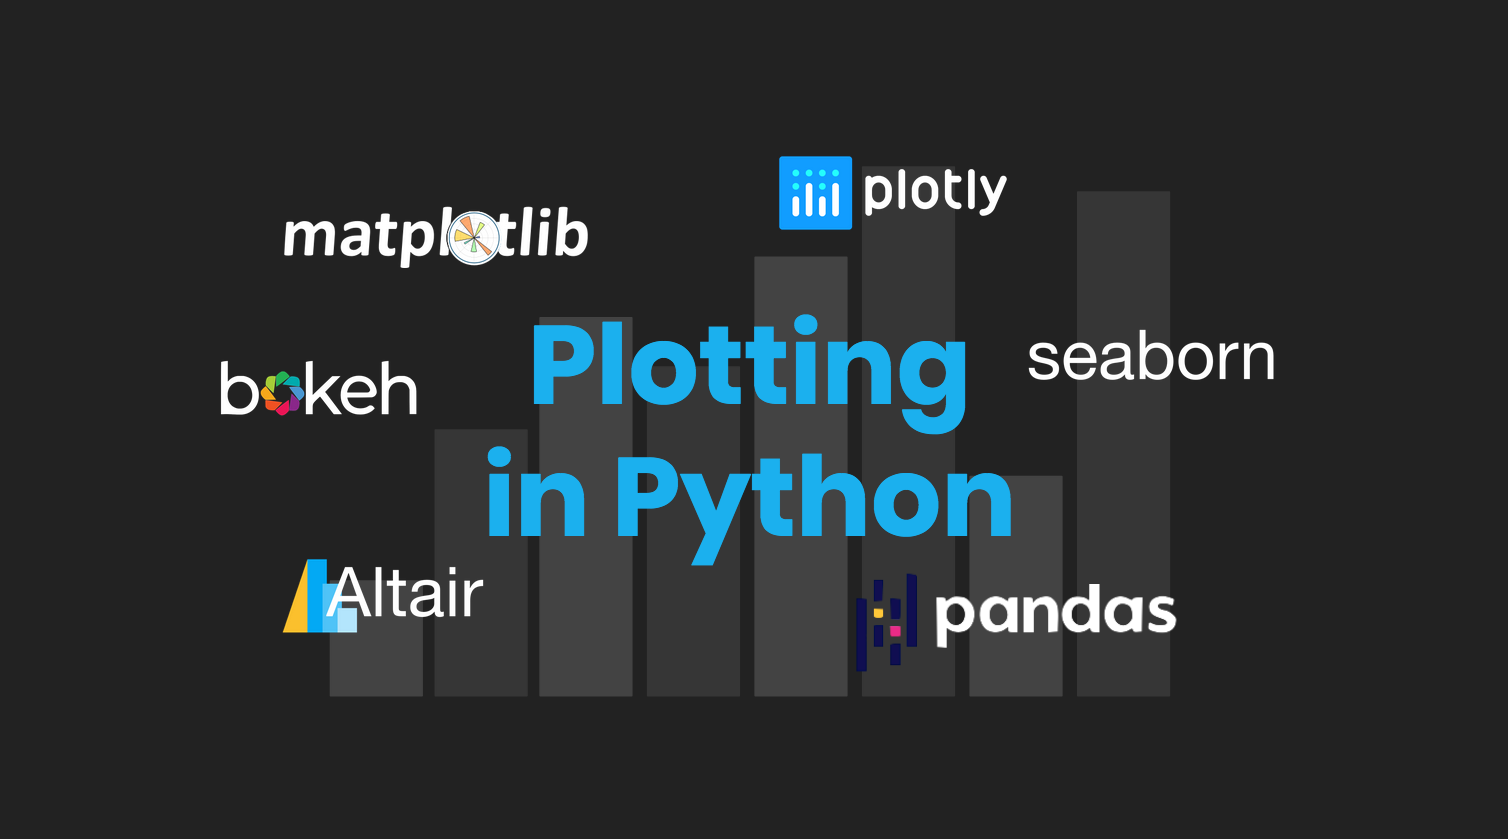
Python is the language of Data Science, and there are many plotting libraries out there.
Which should you choose?
In this guide, we introduce and explain the best-known Python plotting libraries, with a detailed article on each one.
Deploy data science to the web with Deepnote
Generate PDF Invoices with Python
Rapid Prototyping: Building Calendly in 3 Hours