 By
By Workshop: To-do List
We’re going to build a To-Do list app with Anvil, and publish it on the Web, using nothing but Python.
To follow along, you need to be able to access the Anvil Editor. Create a free account using the following link:
Step 1: Building the UI
Open the Anvil Editor to get started.
Click the ‘Create New App’ button and select the Material Design theme.
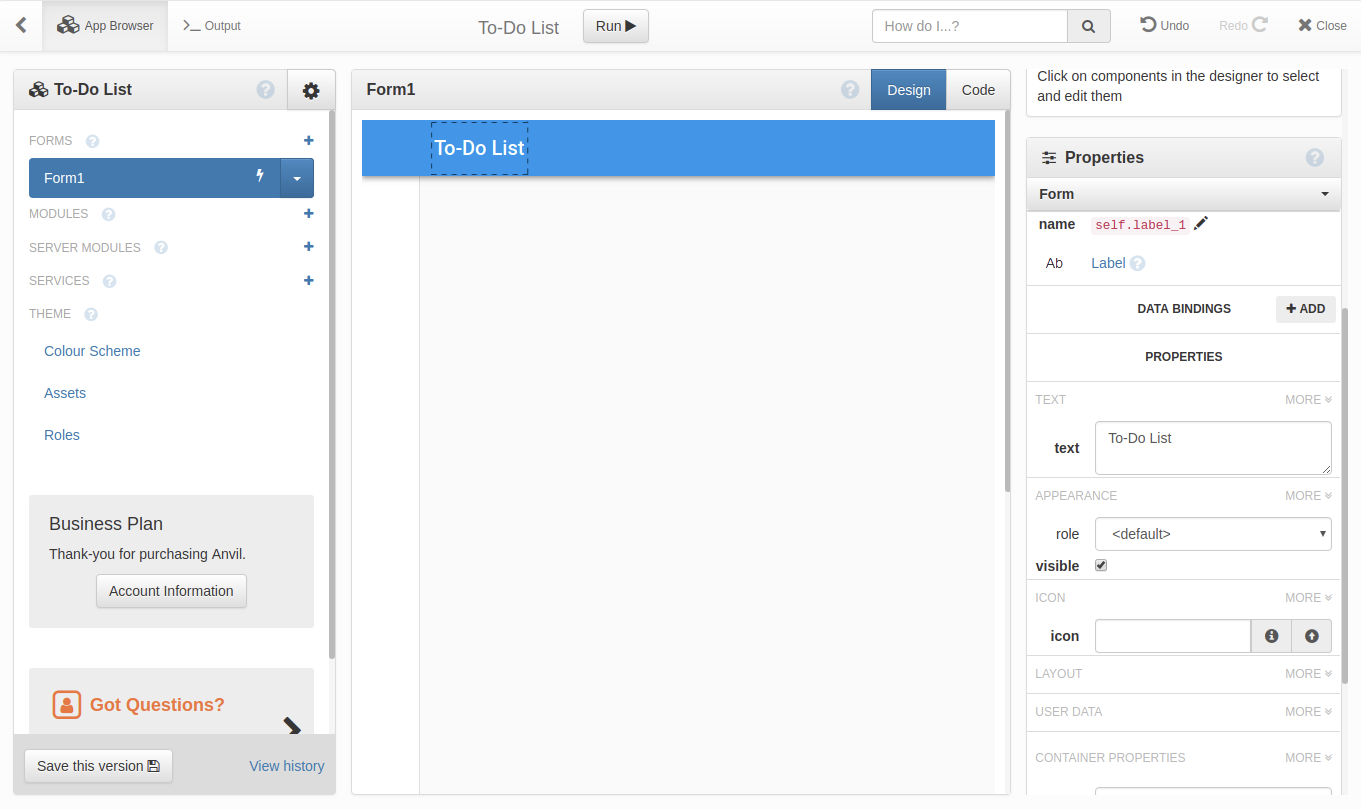
You are now in the Anvil Editor.
First, name the app. Click on the name at the top of the screen and type in a name like ‘TODO List’.
Now we’ll build a User Interface. The toolbox on the right contains components that you can drag-and-drop onto the Design view in the centre.
Drop a Label into the blue bar at the top, where it says ‘Drop title here’. In the Properties tool on the right, enter a title into the text section.
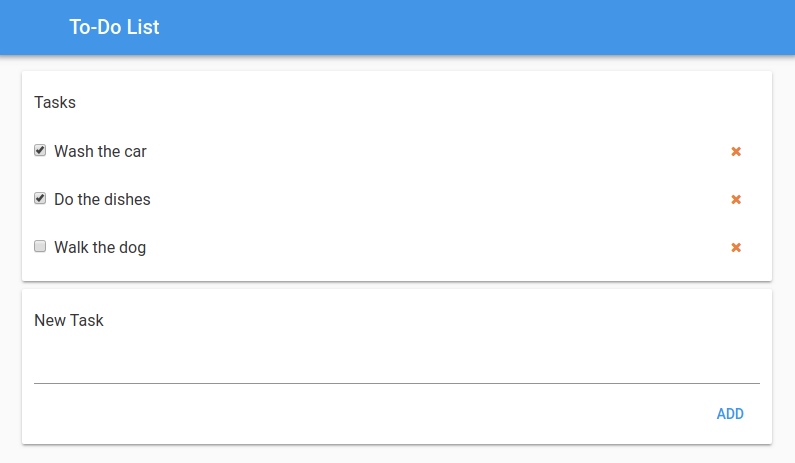
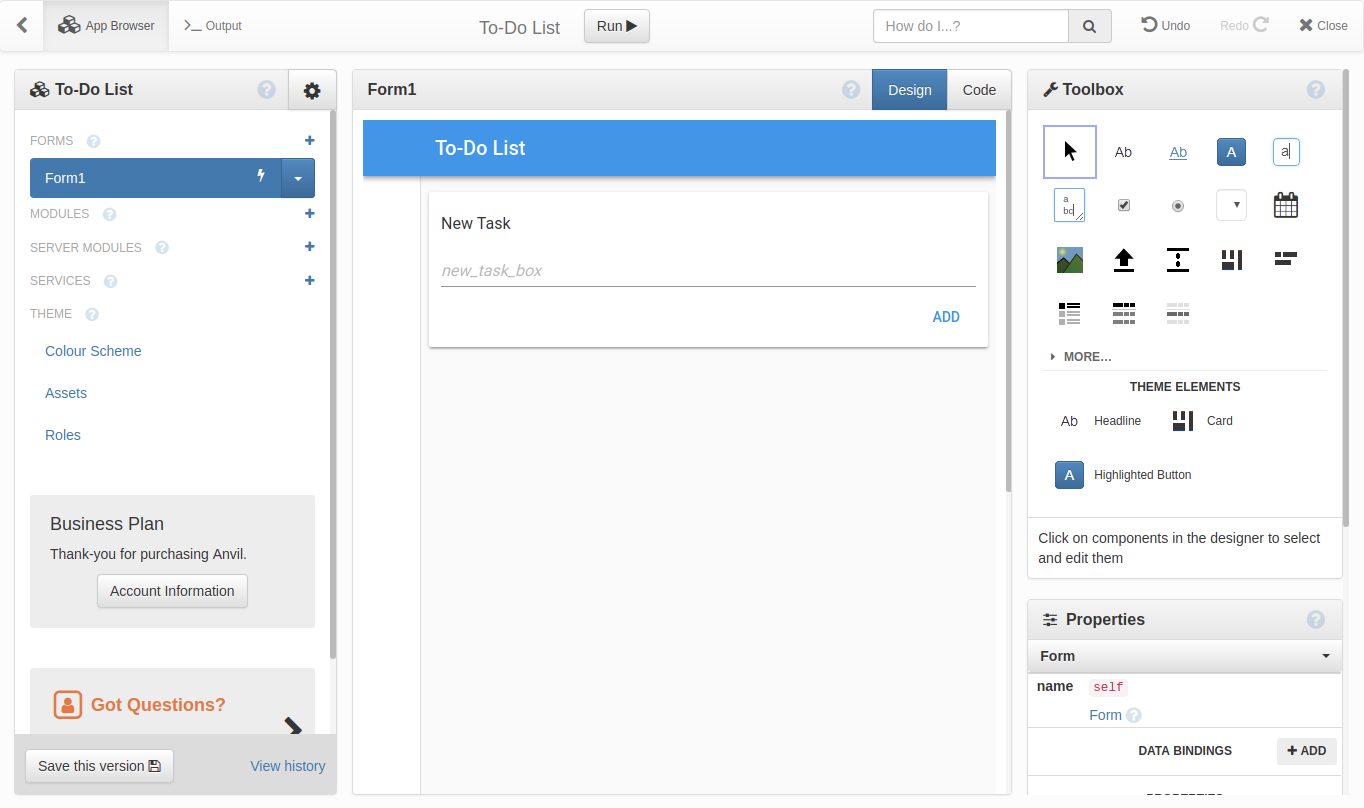
Add a Card to the page. Inside the card, put a Label, a TextBox, and a Button.
Set the Label’s text to say New Task and set its role to subheading.
Set the TextBox’s name to new_task_box.
Rename the Button to add_btn, set its text to add and align it to the right.
We’ve just designed a data entry UI for adding tasks to the TODO list.
The next step is to make it do something.
At the bottom of the Properties tool for the Button is a list of events that we can bind methods to. Click the arrow next to the click event:
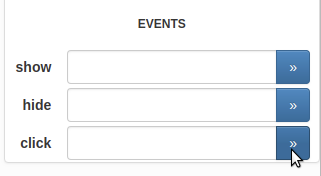
You should see some code that looks like this:
def add_btn_click(self, **event_args):
  """This method is called when the button is clicked"""
  pass
Remove the pass and add a call to the built-in alert function:
def add_btn_click(self, **event_args):
  """This method is called when the button is clicked"""
  alert(self.new_task_box.text, title="new task")
Run the app. When you click the button, you’ll get a dialog box displaying the text you entered into the text box.
Step 2: Create
We’ve built an app with some UI that echoes back what you enter into it, in an alert box.
Now we’ll put the TODO items into the database.
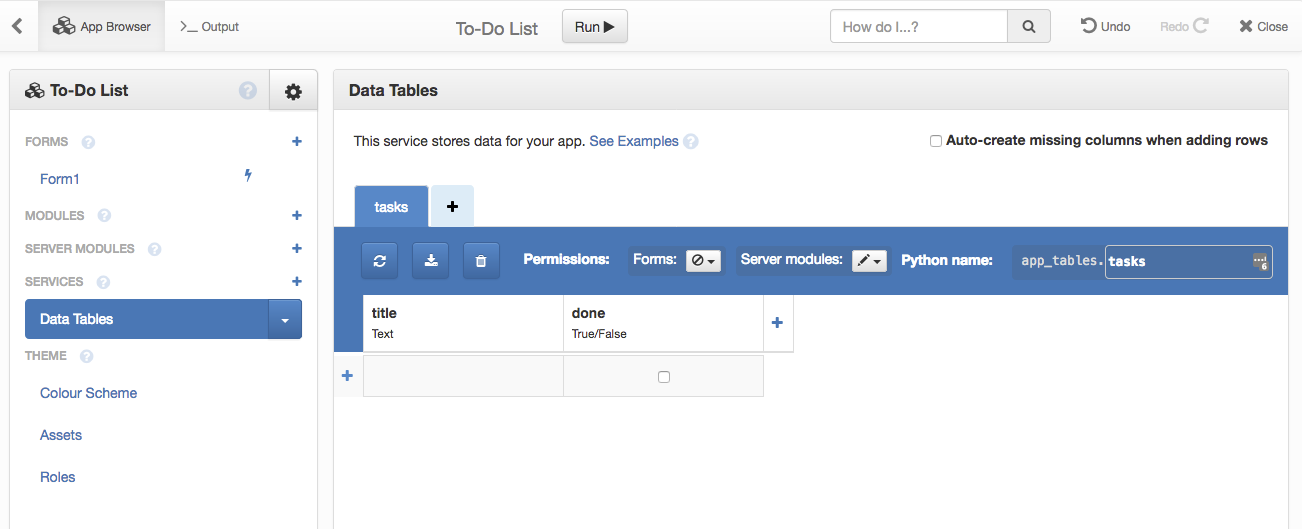
2A: Set up a Data Table
Click on the + next to ‘Services’ in the panel on the left.
Click on ‘Data Tables’.
Add a table called ‘tasks’.
Add columns called ‘title’ (type: text) and ‘done’ (type: True/False).
2B: Make the add button populate the Data Table
Now you need to hook the button up so that it adds a row to the table.
Click on the + next to ‘Server Modules’ in the panel on the left. You’ll see some code with a yellow background.
Write this function.
@anvil.server.callable
def new_task(title):
app_tables.tasks.add_row(title=title, done=False)@anvil.server.callable decorator means it can be called from the client.
Go back to Form1 and delete the alert from add_btn_click. In its place, write these two lines:
  anvil.server.call('new_task', self.new_task_box.text)
  self.new_task_box.text = ""
Now hit ‘run’, fill in some TODO items and click the Button. Stop the app and look in the Data Table - you should see your TODO items there.
Step 3: Read
You should now have a data-entry app that can record new tasks. Next, we’ll display the tasks within the app.
3A: Get tasks from the database
In your Server Module, write:
@anvil.server.callable
def get_tasks():
  return app_tables.tasks.search()
This fetches every row from the tasks table (the actual data is loaded just-in-time).
Now go back to Form1. Add these three lines to the end of the __init__ method:
tasks = anvil.server.call('get_tasks')
for row in tasks:
  print(row['title'])
If you run this app, it will print all the tasks in your database, in the Output window.
3B: Display them on the screen
Add a new card above the “new task” card.
Add a Label to it, with text as Tasks and role as Subheading.
Add a RepeatingPanel to this card. Double-click on the RepeatingPanel to edit its template. (If Anvil asks, say that you’ll be displaying rows from the Tasks table.)

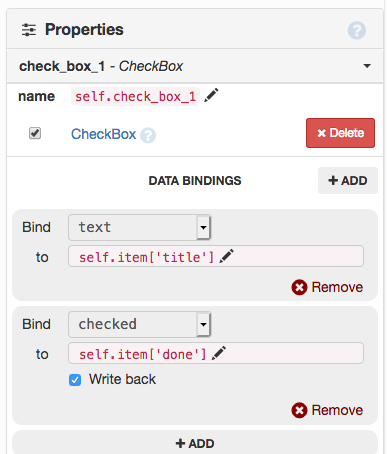
Add a CheckBox to this template.
Go to the Properties section and add two data bindings:
- Bind the
textproperty toself.item[‘title’] - Bind the
checkedproperty toself.item[‘done’]. Ensure the box markedWrite backis checked.
Go to Form1 and delete the two lines of the for loop. Put this line in their place:
self.repeating_panel_1.items = tasksRun your app to see all the tasks from your database.
If you try to check one of the CheckBoxes, you’ll see a “Permission Denied” error - something like this:
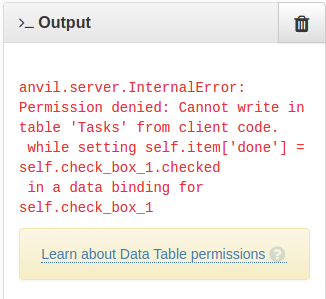
That’s because the data is currently read-only. We’ll fix that in the next section.
Step 4: Update
4A: Make the rows client-writable
The error occurs because we enabled write back in the Data Binding for self.item['done'].
This means that, whenever the user checks or unchecks the CheckBox, Anvil runs:
self.item['done'] = self.check_box_1.checkedwhich updates the database. That’s great, but when we returned those tasks from the server module, we returned read-only database rows. So we get a “permission denied” error when we tried to update one.
To fix this, we can return client-writable rows from the server.
Go back to the Server Module, and change the get_tasks() function to this:
@anvil.server.callable
def get_tasks():
  return app_tables.tasks.client_writable().search()
Now run the app and check and uncheck those CheckBoxes. The app will update the done column in the Data Table accordingly.
4B: Refresh the list when you add an item.
So far so good, but when you add a new task, it doesn’t show up!
That’s because we only fetch the list of tasks once, when we start up.
Let’s put that refresh code into its own method (self.refresh()), and call it when we add a new task, as well as on startup.
Here’s a full code listing with that modification applied:
class Form1(Form1Template):

  def __init__(self, **properties):
    # Set Form properties and Data Bindings.
    self.init_components(**properties)

    # Any code you write here will run before the form opens.
    self.refresh()

  def refresh(self):
    tasks = anvil.server.call('get_tasks')
    self.repeating_panel_1.items = tasks

  def add_btn_click(self, **event_args):
    """This method is called when the button is clicked"""
    anvil.server.call('add_task', self.new_task_box.text)
    self.refresh()
Now we just need to be able to delete items and we have a full CRUD app.
Step 5: Delete
We’re going to add a Button to each TODO item that allows you to delete that item.
Go to the Design View for Form1, and double-click on the RepeatingPanel to edit its ItemTemplate.
Add a Button from the ToolBox and style it as you think a delete button should look.
Create a click handler for it in the same way as for the ‘add’ button in Step 1. This creates an auto-generated method on ItemTemplate1.
Remove the pass statement and write self.item.delete() in its place. The self.item of ItemTemplate1 is a Python
object representing a row from the database. Calling its delete method deletes it from the database.
After that line, write self.remove_from_parent(). This removes the present instance of ItemTemplate1 from the
RepeatingPanel it belongs to.
The final click handler is:
def delete_btn_click(self, **event_args):
  """This method is called when the button is clicked"""
  self.item.delete()
  self.remove_from_parent()
Congratulations - you’ve now written a full CRUD application!
This pattern can be adapted to any application that requires storage of relational data. In fact, you can literally copy this app and modify it to suit your use-case (see the end of this tutorial to find out how.)
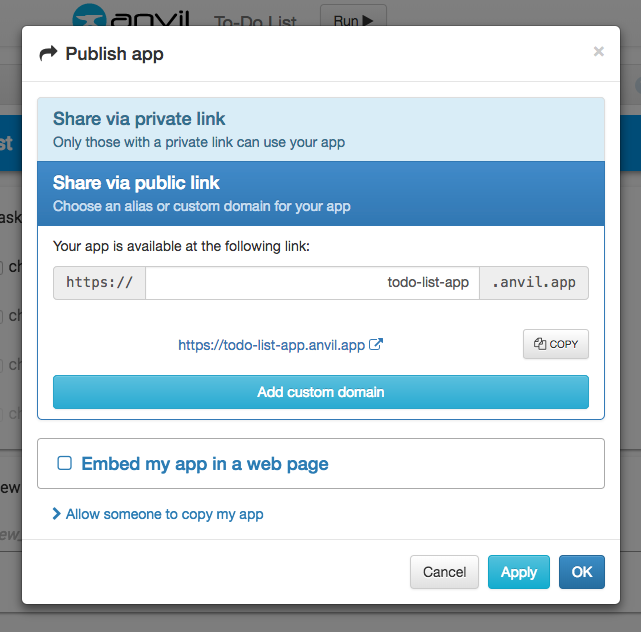
It’s already published online at a private, unguessable URL. You can also publish it on a public URL using the Publish App dialog
from the Gear Menu ![]() :
:
Next, we’ll make users sign-in and give them separate TODO lists.
Step 6: Users
Step 6A: Creating users
Click on the + next to ‘Services’ on the left and click on ‘Users’ to add the Users service.
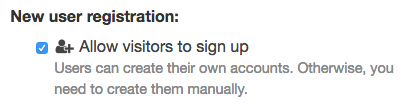
Disable the check box marked ‘Allow visitors to sign up’. We’ll enable this in Step 7, but for now we’ll add users manually.
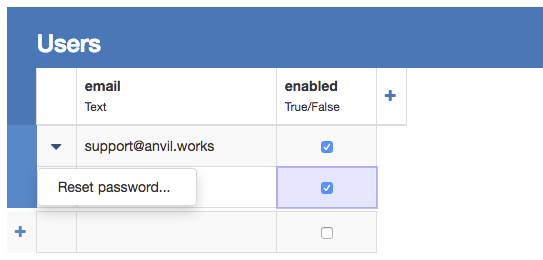
You’ll see a screen with a table at the bottom headed ‘Users’, with columns ‘email’ and ‘enabled’. This table is also present in the Data Tables window.
Add a couple of users manually by simply filling in the table. Remember to check the checkbox in the enabled column!
Set a password for your users by clicking the arrow next to their row and clicking ‘set password’. This will add a column for the password hash, and populate it automatically based on a password you enter.
Step 6B: Restricting access
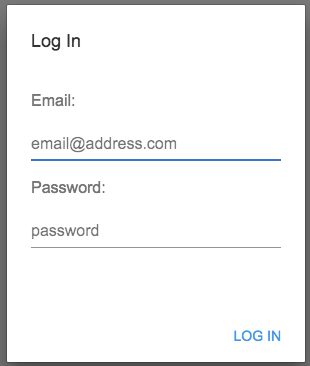
In the __init__ for Form1, call anvil.users.login_with_form():
class Form1(Form1Template):

  def __init__(self, **properties):
    # Set Form properties and Data Bindings.
    self.init_components(**properties)
    # Any code you write here will run before the form opens.
    anvil.users.login_with_form()
Now a login form is displayed when anybody accesses the app.
Of course, someone might bypass this login box by tinkering with the page source in their browser. To be properly secure, we need to enforce access control on the server.
So in the Server Module, add an if statement to each of your functions that checks if a user is logged in before reading/creating tasks:
@anvil.server.callable
def new_task(title):
  if anvil.users.get_user() is not None:
    app_tables.tasks.add_row()

@anvil.server.callable
def get_tasks():
  if anvil.users.get_user() is not None:
return app_tables.tasks.client_writable().search()Now a user has to log in before they can see the tasks and add/edit them.
Step 7: Multi user app
Now you have a single TODO list that can be accessed by a restricted set of users.
What if you want to give each user their own TODO list?
Let’s restrict each user’s view so that their own list is private to them.
Step 7A: Associating tasks with users
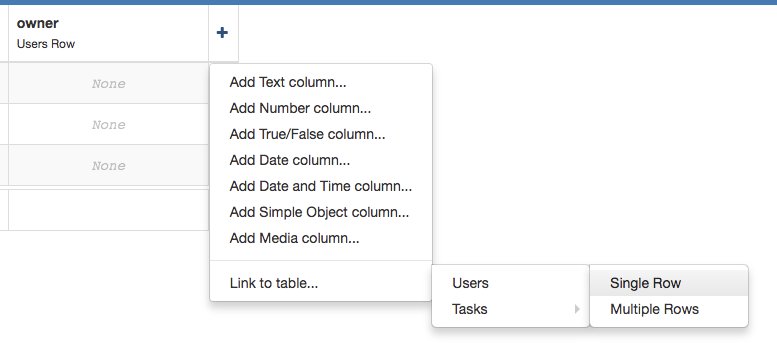
Add a new column to the ‘tasks’ table called ‘owner’. When selecting the data type, use ‘Link to table’ and select Users->Single Row.
Modify the new_task server function to fill out the owner to be the current user:
@anvil.server.callable
def new_task(title):
  if anvil.users.get_user() is not None:
    app_tables.tasks.add_row(
      title=title,
      done=False,
      owner=anvil.users.get_user()
    )
Step 7B: Displaying only logged-in user’s tasks
To ensure the logged-in user sees only their tasks, restrict the client-writable view to only rows where the owner is the current user:
@anvil.server.callable
def get_tasks():
  if anvil.users.get_user() is not None:
return app_tables.tasks.client_writable(owner=anvil.users.get_user()).search()Now add a new user manually into the table and log in as them.
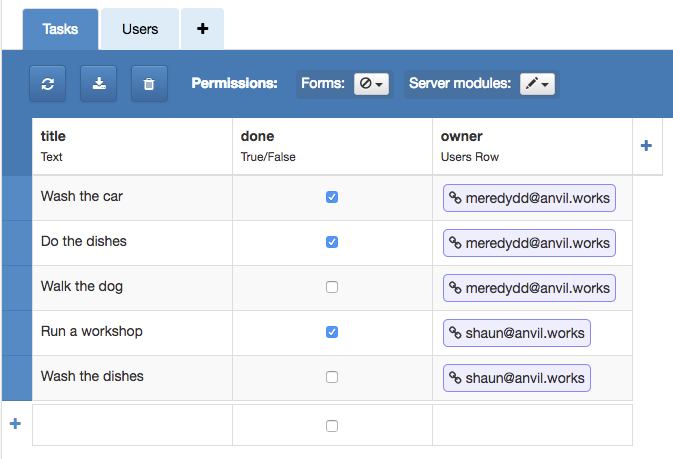
You should see an empty TODO list. Add tasks as normal - they show up as normal. Check the database - you can see that they’ve been added to the ‘tasks’ table and they’re linked to the new user.
Now that users can’t see each others’ tasks, it’s safe to enable the Sign Up functionality.
Check the box in the Users screen marked ‘Allow visitors to sign up’.
Run your app again and you’ll find that the login screen includes a signup process with email verification. So now users have their own private TODO lists and new users can sign up.
Congratulations, you’ve just built a multi-user CRUD app in Anvil!
Clone the finished app
Every app in Anvil has a URL that allows it to be imported by another Anvil user.
Click the following link to clone the finished app from this workshop:
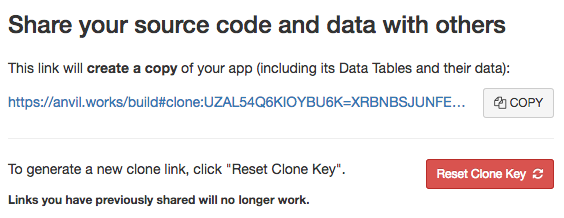
To share your app, click on ‘Share your app’ in the Gear Menu ![]() and
copy the link in the section headed “Share your source code and data with others”:
and
copy the link in the section headed “Share your source code and data with others”:
It’s also live on the internet already, see Publish App in the Gear Menu ![]() for details.
for details.