
 By
By So you’ve built a notebook with Google Colab, and then turned it into a web app with Anvil. Congratulations – now other people can use your code!
What happens next? Well, if you want your app to stay available when you close your browser window, you’ll need to deploy it somewhere. Let us show you how!
Run a Google Colab Notebook on any machine
Google Colab is a great tool for running Python notebooks on the web. But your notebooks will only run continuously for up to 12 hours. So what if you want to keep your code running indefinitely so that others can interact with your project?
We’ve previously shown you how to turn a Google Colab notebook into a web app with Anvil. In this tutorial, we’ll take it one step further. We’ll use Docker to set up our notebook as a web service, so our web app can keep running without us worrying about our Google Colab notebook timing out.
For this tutorial, we’ll use the notebook from the previous tutorial. We’ll first download the Google Colab notebook and Docker on to our local machine. Then, we’ll create the necessary files to set up our Docker container and run it. Once we’ve gotten our container running locally, we can move it to an external server. Let’s get started.
What is Docker?
Docker is a platform for packaging your applications in a portable environment called a container, which will run the same on any machine as long as Docker is installed.
To build a Docker “image” (the read-only template from which we launch a container), we are going to create a Dockerfile: a text file containing a set of very specific instructions on how to build the container and set up its environment. We are then going to create a docker-compose file: a set of specific instructions about how to build an image from the Dockerfile and launch it as a container.
Because containers (and the system that builds them) is isolated from the machine’s infrastructure, the recipe in the Dockerfile is going to come out the same every time, whether we’re building on our own laptop or on a server in the cloud. This means we can construct a consistent Python environment to run your Google Colab, Jupyter or local code on an external server. That container will have consistent versions of every Python library, so your code won’t be disrupted by upgrades, and will continue to work forever1.
Step 1 - Exporting the Google Colab Code
We’ll start by exporting our Google Colab notebook as a Python script. You can find the notebook from the Google Colab tutorial here:
In your Colab notebook, go to File and then select Download .py. This downloads your notebook as a Python script on your local machine.

Once it is downloaded, make a new directory and move the script into it. For the iris classifier, we can name the directory iris-classifer. We’ll put all the files we need for our Docker container into this directory.
mkdir iris-classifier
mv iris-classifier.py iris-classifier
Step 2 - Creating a requirements file
In the same directory as our downloaded python script, we’ll need to create a requirements.txt file listing the Python libraries that we need to run our script. Running !pip freeze in a Google Colab cell will list all the currently installed packages on the Colab server. We can use this to pull the correct versions of just the packages we need. For our iris classifier, our requirements.txt file should look something like this:
sklearn==0.0
matplotlib==3.2.2
anvil-uplink==0.3.36
Step 3 - Downloading and installing Docker
Now, let’s download and install the current version of Docker onto our local machine. You can download Docker and see the full installation guides for each operating system here:
Step 4 - Creating the Dockerfile
Next, we need to create a file called Dockerfile (with no file extension) in the iris_classifer directory where our Python and requirements.txt files live.
A Dockerfile is a text-based script of instructions that is used to create a container image. The image is a template for the container which will run our application, and a container is a running instance of the image.
Create a file called Dockerfile and open it in a text editor. Start start by adding:
FROM python:3.8Normally when we build a Docker image, we’ll base it off of an image that already exists. The FROM instruction is the first layer in our Docker image and indicates which image to base ours on. In this case, we’re using the Python 3.8 image.
Next, we’ll write an ADD instruction to add our requirements file to the container image.
ADD requirements.txt /We also need a RUN instruction to pip install all the packages in our requirements.txt. We’ll do this step first because if we need to change something and rebuild the image, Docker will only re-run the steps it needs to. By doing the pip install before we ADD our code, we can change our code and rebuild the image without installing all our packages over again.
RUN pip install -r /requirements.txtAfter installing the requirements, we should ADD our Python script. If your app needs any other files or directories (a folder containing a trained model, for example), they will also need to be added here:
ADD iris-classifier.py /We also need to ensure that the output from our Python script is not buffered. Adding the following to our file will output any logs in real time:
ENV PYTHONUNBUFFERED=1Finally, let’s add an instruction to run our Python script:
CMD [ "python", "./iris-classifier.py" ]That’s it, our finished Dockerfile should look something like this:
FROM python:3.8

ADD requirements.txt /

RUN pip install -r  /requirements.txt

ADD iris-classifier.py /

ENV PYTHONUNBUFFERED=1

CMD [ "python", "./iris-classifier.py" ]
We’ve now got a Dockerfile which will build a container image containing our Python script that we can deploy on any machine.
Step 5 - Creating the Docker Compose file
We’ll be using Docker Compose to run our container. For most Mac and Windows users, installing Docker will also install Compose. Check here to see if you need to install Compose separately. Linux users can follow these instructions.
Using Docker Compose allows us to configure our container with a YAML file, then run it from the terminal. This keeps all of our build and run commands in one place. If we need to stop and restart our container, we don’t need to remember what commands we ran last time.
In the iris-classifier directory, create a file called docker-compose.yml. Add the following to this file:
version: "3"
services:
iris-classifier-uplink:
# if something fails or the server is restarted, the container will restart
restart: always
container_name: iris-classifier-uplink
image: iris-classifier-uplink
build:
# build the iris clasifier image from the Dockerfile in the current directory
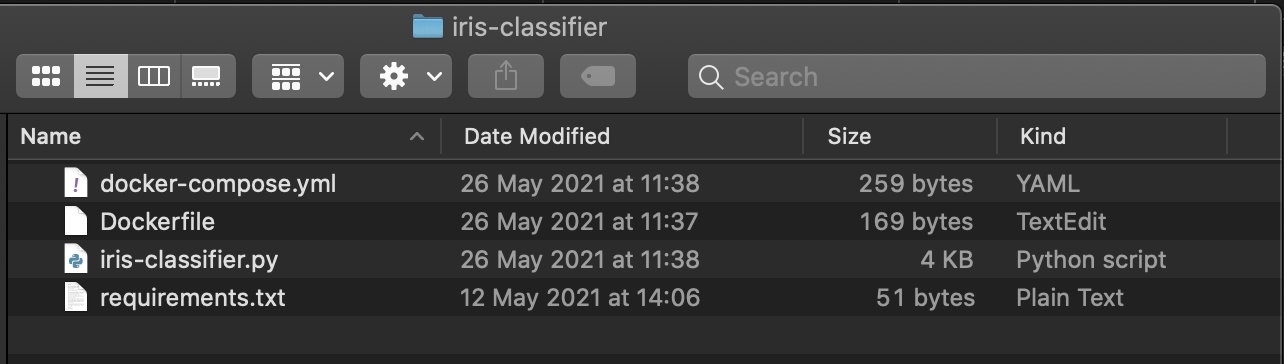
context: . Now we should have the .py file, requirements.txt, the Dockerfile, and docker-compose.yml in our directory.
Step 6 - Starting our web service locally
Now that we have our Dockerfile and docker-compose.yml, we can start our web service. While in the same directory as the other files, run the following commands:
docker compose build

docker compose up -d
The docker compose build command uses our Dockerfile to build a container image. The docker-compose up -d command starts a container using this image as a template. The -d flag means the container will run in ‘detached’ mode, in other words, it will run in the background.
That’s it, our Python script is now running in our Docker container! If we got it right, it’s already connected to the Anvil Uplink and is ready to be used from our web app!
Step 7 - Checking and stopping our web service
To list the running containers on our machine, we can use the docker ps command in the terminal:
docker psCONTAINER ID IMAGE COMMAND CREATED STATUS PORTS NAMES
27736212f57f iris-classifier "python ./iris_class…" 10 minutes ago Up 9 minutes image-classifierTo check the output from our container, we run docker-compose logs in the iris-classifer directory:
docker-compose logsAttaching to iris-classifier-uplink
iris-classifier-uplink | Connecting to wss://anvil.works/uplink
iris-classifier-uplink | Anvil websocket open
iris-classifier-uplink | Connected to "Default environment (dev)" as SERVERdocker-compose logs -f to follow the live output.To stop our Docker container, run:
docker compose downBut what if we need to change our Python code? All we need to do is make the edits we need to the Python script and run these commands again:
docker compose build

docker compose up -d
Step 8 - Running the web service on a virtual server
Now that we have containerized our web app with Docker and have it running locally, we can now run it on a virutal server. This way, our web app will keep running even when our computer is not. There are a lot of options for running your web service on a Linux virtual server, including Amazon Lightsail, Digital Ocean Droplets, Linode and Microsoft Azure.
Once we’ve set up our virtual server, we need to install Docker, copy our iris-classifier directory to the virtual server, and build and run our container image just like we did locally.
# Copy the recipe for my docker container onto the server
scp -R iris-classifier/ my-server.host.name:iris-classifier/
# Log into my server
ssh my-server.host.name
# Install docker
curl -fsSL https://get.docker.com | sudo sh
# Build and start the container
cd iris-classifier/
docker compose build
docker compose up -d
# I can now log out, and my code will stay running!
exit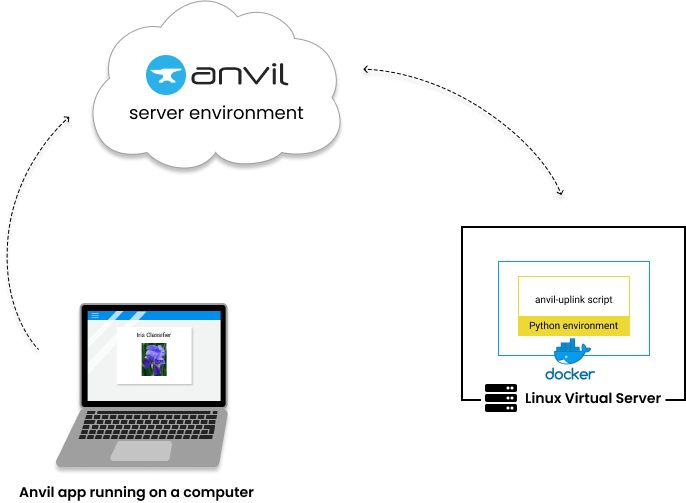
Debugging Tips
Is your app not working as expected? Here are a few tips to help you troubshoot:
I’ve changed my notebook (or script), but when I call it from my app it’s doing the same thing as before
If you’ve made any changes to your Python script, make sure to run docker compose build to rebuild any images. Then start the container with docker compose up. (If you don’t rebuild and restart, you could be using an old image built with an old version of your script.)
I’m making calls in my Anvil app, it looks like they’re running, but they aren’t running in my container
If you have the same Uplink key connected to a script running elsewhere, Anvil will spread its calls over every connected uplink. Check whether you have another script running somewhere (eg in the Colab notebook, or on another computer?)
I’m getting a file not found error when I run my app in Docker
Make sure that all files and directories you need to run your app are being ADDed in your Dockerfile. If everything has been added, make sure that the files are where your script is expecting them to be.
For example, if your adding your file with ADD data/model.h5 /, then model.h5 should be loading in your Python script as model.h5. If you add the file with ADD data/model.h5 /data, then your script needs to load data/model.h5.
My app requires access to a GPU.
Make sure Docker is up to date, then check out this page to expose your GPU to your container.
My container connects then constantly restarts
Make sure that your script calls anvil.server.wait_forever() (or somehow stops the script from exiting). Without this, the script will run to completion, quit, then restart.
General help
You can always add print statements to your Python script, rebuild your Docker container with docker compose build, rerun it with docker compose up then view the output with docker compose logs.
Check out the Docker documentation for more help with using Docker.
If you’re still having trouble getting your Anvil app up and running, join us on the Anvil Community Forum and ask your question there.
Further reading
Docker
You can do a lot with containers and Docker - I’d recommend reading the Docker overview guide and taking a look at some of their example app containers to learn more.
New to Anvil?
If you’re new here, welcome! Anvil is a platform for building full-stack web apps with nothing but Python. No need to wrestle with JS, HTML, CSS, Python, SQL and all their frameworks – just build it all in Python.
Yes – Python that runs in the browser. Python that runs on the server. Python that builds your UI. A drag-and-drop UI editor. We even have a built-in Python database, in case you don’t have your own.
Why not have a play with the app builder? It’s free! Click here to get started:
Try a 10 minute tutorial
Want to build an app but not sure where to start? Try one of our tutorials:
Data Dashboard
Build Database-Backed Apps
Build a Simple Feedback Form
Build a data-entry app, and learn the techniques fundamental to building any Anvil app. In this tutorial, you will:
- Build your User Interface
- Write client-side Python
- Write server-side Python
- Store data in a database
- Deploy your app
-
At least until the inevitable heat death of the universe ↩︎